Item added to cart ×

Four Signals. One Cable.

Four Signals. One Cable.

How Pro-Conex Changes the Way You Run a Signal.

If you’ve ever taped down four XLR cables where one should do, pulled new wire through a wall that already had Cat6 in it, or lost a DMX universe mid-show because a connector vibrated loose — this is the guide for you.

The Idea: Replace Four XLR Runs with One Shielded Cat Cable

Professional XLR cable is great. It’s robust, universal, and every tech on the planet knows how to use it. The problem isn’t the cable — it’s running four of them everywhere. Four cables to route, four to tape, four connection points to check at show time, four things to chase at strike.

The Pro-Conex system doesn’t replace XLR at the gear. It replaces the trunk run between locations. A LittleCat (DFX-345) or DNX-300 breakout box sits at each end. The four XLR lines plug into the fan-out on each box. In between, a single shielded Cat cable carries all four channels. The connections at the gear stay exactly the same. What changes is everything in the middle.

The result is a slimmer run, fewer connection points to fail, and — critically — the ability to use infrastructure that’s already there. Shielded wall ports, existing conduit, in-ceiling Cat runs installed for networking and never used for audio. If that infrastructure is in the building, this system uses it.

The Core Idea

Instead of running four separate XLR cables to your endpoint, you run one locking Cat6. A LittleCat or DNX breakout box sits at each end and fans out to your four individual channels. One locked connection in the middle that vibration, foot traffic, and road cases can’t pull free. And if the infrastructure is already there — shielded Cat in the walls, existing conduit — you’re using it instead of fighting around it.

Hosa EtherLOK Cat6 locking connector

The Backbone: Hosa EtherLOK Cat6 (ETC-100 Series)

The cable spec is not incidental here. The Hosa EtherLOK Cat6 uses SF/UTP construction — braid and foil shielding around all four twisted pairs. That shielding does two things that matter for this application: it blocks the EMI and RFI interference you’ll encounter near dimmer racks, moving light power supplies, and dense electrical environments; and it maintains the common ground that’s required when running +48V phantom power for condenser microphones.

The connector is equally important. The EtherLOK shell locks into Neutrik etherCON-compatible chassis connectors — the same locking mechanism used on the LittleCat and DNX boxes. A standard RJ45 can be kicked loose by a road case or pulled free by someone walking through a cable. The EtherLOK doesn’t release until you press the tab. On a stage floor or in a crowded rack, that difference is the difference between a signal you can trust and one you’re constantly checking.

Specification Detail
Series ETC-100
Connector RJ45 with EtherLOK Locking Shell (Neutrik etherCON compatible)
Standard Cat6 (Category 6), 250 MHz bandwidth
Conductors 26 AWG x 4 twisted pairs, OFC
Shielding SF/UTP — braid + foil
Outer Diameter 6.2 mm (0.245″)
Jacket Black PVC
Warranty Hosa Lifetime Warranty
Hosa EtherLOK Cat6 ETC-100 Series

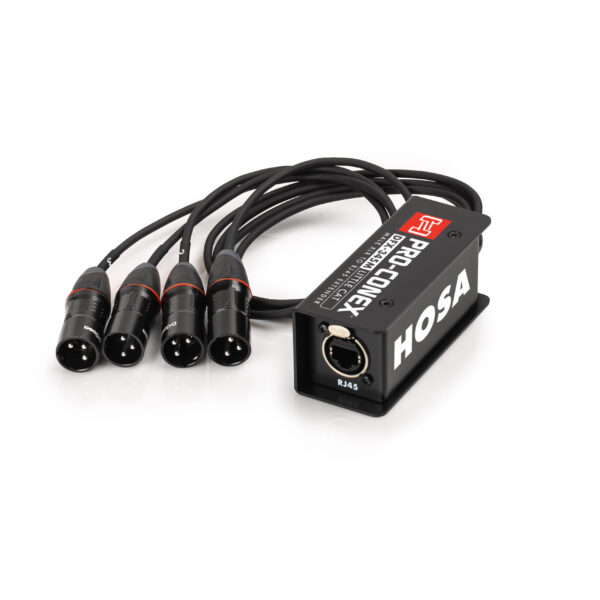
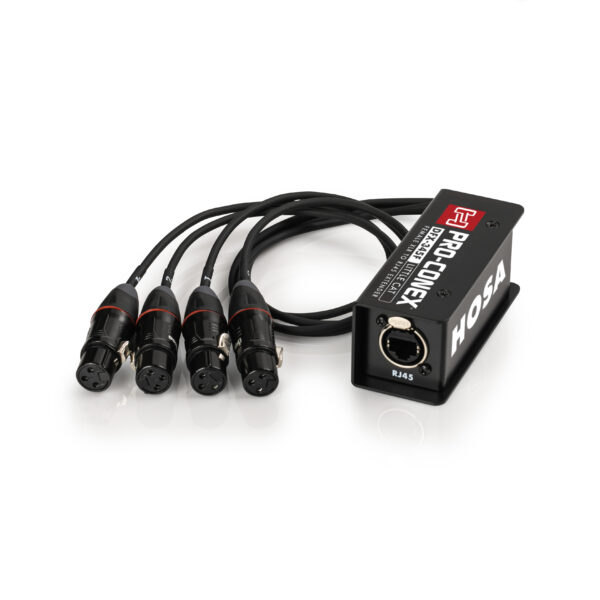
Pro-Conex LittleCat (DFX-345) — Built for Close-Quarters Connections

The LittleCat is a galvanized steel breakout box with a 12-inch integrated XLR fan-out whip permanently attached. That detail matters: because the fan-out is built in, the LittleCat is designed to sit directly at the gear — plugged into a console input, tucked into a table cubby, or mounted at a wall plate. No separate patch cables. No additional infrastructure between the box and the equipment.

Two versions cover both ends of a typical run:

  • DFX-345M (Male XLR fan-out): Plugs directly into the inputs of a mixing console, DSP, power amp, or any device with XLR female inputs. This is your “destination” end — the Cat cable comes in, four balanced signals go directly to your gear.
  • DFX-345F (Female XLR fan-out): Accepts signals from microphones, DIs, or any XLR male source. This is your “source” end — four inputs consolidate into a single Cat cable run to wherever the signals need to go.

The LittleCat is passive and built tough — galvanized steel housing, integrated strain relief, no power required, no configuration, no drivers. Signal in, signal out.

Hosa Pro-Conex LittleCat DFX-345M — Male XLR fan-out
Hosa Pro-Conex LittleCat DFX-345F — Female XLR fan-out

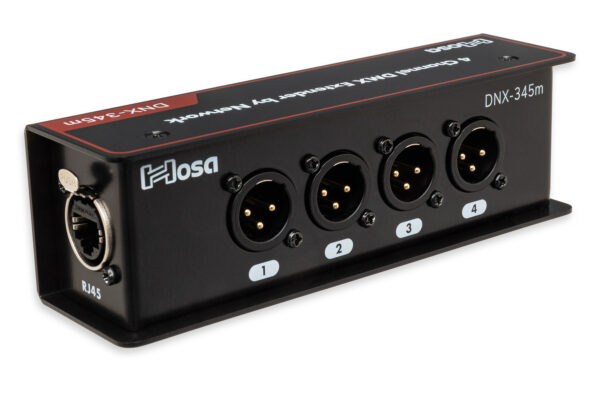
Pro-Conex DNX Series (DNX-345) — Built for Fixed Termination Points

The DNX Series serves a different role. Where the LittleCat’s integrated whip is designed to terminate directly at gear, the DNX boxes are built for fixed positions — a stage floor termination point, a lighting truss, a permanent install location where the Cat cable arrives and XLR cables depart to individual fixtures or devices nearby.

The DNX-345 is specifically engineered for AES3 and DMX compliance, maintaining the 110-ohm impedance required for stable digital signal transmission. This matters for DMX in particular: analog audio is generally forgiving of impedance variation, but DMX data isn’t. If you’re running four universes over Cat, the DNX is the correct tool — not because the LittleCat won’t pass the signal, but because the DNX is built to the spec that DMX requires.

Like the LittleCat, the DNX uses locking RJ45 connectors on the Cat side, and it’s available in Male (XLR3M) and Female (XLR3F) configurations to match the direction of your signal flow.

The two product families also work well together in a mixed configuration: a DNX box on the stage floor or truss as a rugged fixed termination point, and a LittleCat in the rack or console cubby for a clean direct-to-gear connection at the destination. One EtherLOK trunk connects them. Each end uses the right tool for its environment.

Hosa Pro-Conex DNX-345M extender box — Male XLR
Hosa Pro-Conex DNX-345F extender box — Female XLR

Technical Note: This Is Analog Over Copper — Not a Network Solution

The Pro-Conex system uses Category-rated cabling as a physical transport medium, but it is a purely analog, passive pass-through. There is no network protocol involved — no Dante, no AES67, no ART-NET. Do not connect the LittleCat or DNX boxes to a network switch, router, or any active network infrastructure. Doing so will not work and may damage equipment.

  • Shielded cable is required for phantom power. STP Cat5e, Cat6, or Cat7 only. Unshielded UTP cable lacks the common ground path required to safely pass +48V phantom power. The Hosa EtherLOK Cat6 meets this requirement; commodity patch cables typically do not.
  • Passive design, no latency. There is no conversion, buffering, or processing in the signal path. What goes in comes out — in analog, in real time.

Four Ways to Put It to Work

Scenario 01

The Drum Sub-Snake

The situation: Four microphones on a drum kit — kick, snare, overhead left, overhead right — each running its own XLR to the main stage snake or console. That’s four cables on the floor around the kit, four cables to tape, four to step over, four to chase down at strike. The run itself may only be 20 feet, but it’s 20 feet of four cables in a high-traffic area.

The setup: A DNX-345F sits at the drum kit. The four mic cables plug into its XLR female fan-out. A single EtherLOK Cat6 runs from there to a DFX-345M at the stage box or console, where the male XLR fan-out plugs directly into four input channels. One cable on the floor between the kit and the box. One locking connection to verify at show time.

The payoff: The stage floor is cleaner, the run is easier to tape or cable-manage, and strike is faster. The same approach works equally well for a keyboard rig or a pedalboard with four outputs.

Signal Flow

4 Drum Mics → XLR Cables → DNX-345F → 1 EtherLOK Cat6 → DFX-345M → Console Inputs

Pro-Conex drum sub-snake diagram using DNX-345F and DFX-345M
Fig. 1 — DNX-345F at the drum kit consolidates four mic lines into a single EtherLOK Cat6 trunk. DFX-345M at the stage box breaks them back out to four male XLR connections.

Scenario 02

The Corporate Boardroom — Using Infrastructure That’s Already There

The situation: A conference room needs four table microphones routed to a DSP or ceiling-mount processor. The finished space already has shielded Cat ports in the table cubby and the wall. Pulling new XLR through the finished ceiling isn’t in scope, and exposed cable runs on the conference table surface aren’t acceptable to the client.

The setup: A DFX-345F sits in the table cubby. Four microphones plug directly into its female XLR fan-out. The EtherLOK Cat6 runs through the existing shielded wall port to the equipment room, where a second LittleCat breaks the signal back out to the DSP inputs. The existing structured wiring does the work — no new conduit, no exposed surface runs, no visible cable on the table.

The payoff: The integrator saves a conduit pull. The client sees a clean room. And because the EtherLOK’s shielded construction supports phantom power, condenser microphones work exactly as expected through the wall infrastructure.

Signal Flow

Tabletop Mics → DFX-345F → EtherLOK Cat6 → Shielded Wall Port → EtherLOK Cat6 → DFX-345M → DSP / Audio Processor

LittleCat DFX-345F boardroom install using existing shielded wall port
Fig. 2 — DFX-345F in a conference table cubby routes four microphone signals through an existing shielded wall port to a processor in the equipment room. No new conduit, no surface cable runs.

Scenario 03

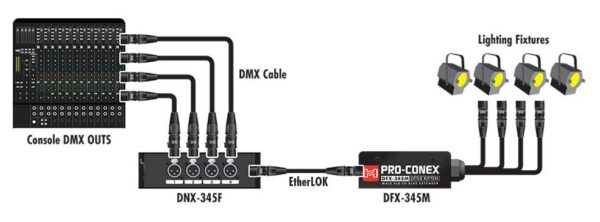
The Four-Universe DMX Trunk

The situation: A lighting designer is running four universes of DMX from the console position to a dimmer rack or distribution node at the other side of the venue. That’s four separate XLR or 5-pin DMX runs — four cables to route, four connectors on the back of the rack to secure, and four places for vibration from the PA or the room to work a connection loose over the course of a long show.

The setup: The DNX-345 — built to AES3 and DMX standards with 110-ohm impedance compliance — handles this correctly. Two DNX boxes, one EtherLOK Cat6 trunk. All four universes travel together through a single locking connection. The DNX’s locking RJ45 chassis connector on the trunk means vibration doesn’t work it free mid-show the way a standard XLR on a truss connection sometimes will.

The payoff: A simpler, more reliable DMX trunk. The 110-ohm spec is not a marketing claim — it’s the reason the DNX, not the LittleCat, is the right tool when digital compliance matters.

Signal Flow

Console DMX Outs → Hosa DMX Cables → DNX-345F → 1 EtherLOK Cat6 → DNX-345M → Fixtures

A diagram of a 4-universe DMX over CAT lighting trunk using Hosa Pro-Conex DNX-345F and DNX-345M interfaces.
Fig. 3 — The 4-Universe Lighting Trunk: Console DMX outputs consolidate into a single EtherLOK run. DNX-345M at the fixture end breaks them back out to individual DMX lines.

Scenario 04

The Studio or Facility Interconnect — Patching Between Rooms

The situation: A recording studio, broadcast facility, school, or house of worship has shielded Cat infrastructure already installed between rooms — live room to control room, stage to booth, classroom to AV closet. That infrastructure was installed for networking or AV distribution, but it works equally well as a physical transport for analog audio when the right interface is on each end.

The setup: A DFX-345F in the live room or on stage. A DFX-345M in the control room or AV rack. The existing shielded in-wall Cat run connects them. Four balanced channels move between rooms through infrastructure that’s already terminated, already routed, and already there — without running new cable under doors or through hallways.

The payoff: This is where the Pro-Conex system pays for itself quickly on a systems integration job. Existing shielded Cat runs are common in modern construction. Using them for audio eliminates both the labor cost and the material cost of pulling dedicated audio lines — and it does so with a passive, no-configuration interface that any tech on the crew can troubleshoot.

Signal Flow

Live Room / Stage → DFX-345F → Existing Shielded Wall Port → EtherLOK Cat6 → DFX-345M → Control Room Rack / DSP


Box vs. Breakout: Which One Do You Need?

The LittleCat and DNX Series solve different problems. Here’s the fastest way to figure out which belongs in your kit.

Feature LittleCat (DFX-345) Extender Box (DNX-345)
Best For Racks, table cubbies, direct-to-gear connections Stage floors, lighting trusses, fixed drop-box positions
Signal Type Analog audio optimized Analog, AES3, and DMX compliant (110-ohm)
Fan-out Built-in 12″ integrated whip — no patch cables needed Modular — requires XLR cables on the fan-out side
Housing Galvanized steel with integrated strain relief Galvanized steel — built for stage floor and truss use
Phantom Power Supported (shielded STP cable required) Supported (shielded STP cable required)
Mixed Use DNX on stage floor + LittleCat in rack = one EtherLOK trunk, right tool at each end

The Pro-Conex Ecosystem

The LittleCat, DNX Series, and EtherLOK are part of a broader Pro-Conex toolkit covering the full signal chain — from source to system. The complete line includes:

Direct Boxes
Bridge unbalanced instruments into a balanced signal chain cleanly. Active options for high-impedance sources and long runs.
Signal Routing
Fixed and portable stage boxes for consolidating channel counts at the source, including the LittleCat and DNX Series.
Power
Ruggedized stage-floor extension and power distribution built for production environments.
Tools & Accessories
Cable testers, work gloves, and deployment tools designed for the demands of load-in and strike.

Stop the Flicker: Why Your DMX Lights Are Failing (and It’s Not the Fixture)

The Secret Killer of Every Light Show: The Wrong Cable

If you’ve ever dealt with flickering lights, random color changes, or total signal dropout mid-set, you probably blamed the lighting fixture. The truth? Your cables are most likely the culprit.

DMX is a digital language, not audio. If you’re using spare mic cables to connect your lighting rig, you are sabotaging your show. Here are the three non-negotiable rules for reliable DMX, and the simple Hosa solutions that guarantee a clean light show every time.

Rule 1: Never Use a Mic Cable for DMX

Sound tech stands in venue holding to xlr cables trying to determine which one is DMX and which one is microphone cable.

Visually, the 3-pin DMX cable looks just like your 3-pin XLR mic cable. But inside, they are completely different.

The Problem (Impedance Mismatch)

DMX lighting requires a specific electrical standard: 120 ohms. Your standard XLR mic cable is typically built for 50-70 ohms. When you run a 120-ohm data signal through a 50-ohm cable, the signal gets corrupted and loses integrity, causing erratic behavior and failure, especially over long runs.

The Cost: Spotty performance that is impossible to troubleshoot while the club is running.

The Hosa Solution: Compliance First

Always invest in dedicated DMX cables. They are built to the precise 120-ohm standard required for digital signal reliability.

Hosa DMX cables are built to the correct specification for reliable data delivery.


Rule 2: Don’t Skip the Terminator

A series of DMX light fixtures shown in a line diagram

This is the simplest, cheapest fix you can make, and it solves 50% of all DMX problems instantly.

The Problem (Signal Reflection)

DMX data needs to be completely absorbed at the end of the line. If the last fixture doesn’t have a built-in terminator (most don’t), the signal “reflects” back up the cable, corrupting the new data being sent. This causes chaotic flickering and freezing.

The Fix: You need a dedicated terminator plug (a resistor that absorbs the signal) at the final fixture in your chain.

The Hosa Solution: The Guaranteed Terminator

Buy a dedicated terminator and leave it permanently attached to the last fixture in your run. It’s non-negotiable.

Hosa DMX512 Terminators are available in common formats.

    • DMX512 Terminator, XLR3M (DMT-414)

Rule 3: Secure Your Network Links

Hosa etc series hooded rj45 cables

If you use a modern lighting controller or console that connects via a network cable (Art-Net or sACN), you are now transmitting DMX data over Cat5/6. These connections are vulnerable.

The Problem (Mechanical Failure)

Standard RJ45 network cables are great for static PCs, but they are not designed to withstand vibration, accidental bumps, or cable pull—all common in a DJ booth or busy club. If a standard RJ45 plug wiggles loose, your entire lighting rig goes offline.

The Fix: Use cables that mechanically lock the connector into the port.

The Hosa Solution: Locking Data Cables

Protect your control signal with cables designed for the chaotic environment of a live setup.

Hosa EtherLOK cables feature locking RJ45 connectors compatible with standard ports, ensuring data security and reliability.


STOP GAMBLING. START GIGGING.

A professional show demands reliable gear. DMX reliability isn’t a luxury; it’s a necessity that protects your reputation.

Don’t gamble your reputation on generic wire. Secure your DMX network today. Click below to use the
Hosa Cable Finder Tool to easily source the correct 120-ohm cables and mandatory terminators!

Holiday Super Bundle Savings!!

Holiday Gifting & Gear Bundles are Here!

Save Up to 37% Off Normal Price!

The holiday season is just around the corner, and we’re excited to help you gear up for less! We’ve curated seven unique, high-value bundles designed to make gifting easy and to ensure your own gear is prepped for the season.

From October 13th to November 30th, 2025, you can grab these bundles at the steepest discounts we’ve offered in a long time. These special prices give you a massive opportunity for savings! Also- all orders $50 or more qualify for FREE FREIGHT!

How to Order

These bundle offers are available for a limited time and must be placed by phone.

To order, call (800) 255-7527 during our business hours:

  • Monday – Thursday: 8:00 am to 5:00 pm PST
  • Friday: 8:00 am to 2:00 pm PST

Please Note: We can only ship these promotional bundles within the United States. Don’t miss out—the promotion ends November 30th, 2025!

The Bundles: High-Value Gear for Less

Clean Freak Bundle 

  • D5S6 CAIG DeoxIT Contact Cleaner, 5% Spray, 5 oz
  • GLZ-102-BULK Goby Labs Hand Sanitizer, 2 oz Bulk
  • GLEK-302 Goby Labs Equip kit
  • HGG-100L Hosa AV work Gloves

  • Original Value: $82.84
  • Bundle Price: $64.95
  • Your Savings: $17.89 (21.6% Off!)

Neat Freak Bundle 

  • CBT-500 Cable tester
  • GFT-447BK-BULK Gaff tape (2in) 60 yards
  • WTI-148G Cable organizer

  • Original Value: $125.85
  • Bundle Price: $99.95
  • Your Savings: $25.90 (20.6% Off!)

Mic Stand Bundle

  • HMIC-025 Pro Microphone Cable, REAN XLR3F to XLR3M, 25 ft
  • MSB-521BK Microphone Stand with Boom, Tripod base, Black
  • MHR-122 Microphone Clip, Spring-clip

  • Original Value: $122.85
  • Bundle Price: $99.95
  • Your Savings: $22.90 (18.6% Off!)

Live Bundle

  • HMIC-025 Pro Microphone Cable, REAN XLR3F to XLR3M, 25 ft (x8)
  • SH-8X0-25 Pro-Conex Little Bro’ Sub Snake, Hosa 8 x XLR Sends and No Returns, 25 ft

  • Original Value: $501.55
  • Bundle Price: $399.00
  • Your Savings: $102.55 (20.4% Off!)

CAIG Deoxit Bundle 

  • D5S-6 CAIG DeoxIT Contact Cleaner, 5% Spray, 5 oz
  • F5S-H6 CAIG DeoxIT FaderLube, 5% Spray, 5 oz
  • G5S-6 CAIG DeoxIT GOLD Contact Enhancer, 5% Spray, 5 oz

  • Original Value: $65.93
  • Bundle Price: $55.95
  • Your Savings: $9.98 (15.1% Off!)

Goby Bundle 

  • GCP-102 Goby Labs Cymbal Polish, 2 oz
  • GLGK-202 Goby Labs Guitar Care Kit
  • GLEK-302 Goby Labs Equipment Care Kit

  • Original Value: $73.85
  • Bundle Price: $59.95
  • Your Savings: $13.90 (18.8% Off!)

Guitar Cable Super Bundle

Available Here: Pro Guitar Cable 2 Pack

  • Hosa HGTR-010LE Pro Guitar Cable 10ft (Qty: 1)
  • Hosa HGTR-015LE Pro Guitar Cable 15ft (Qty: 1)

  • Original Value: $54.90
  • Bundle Price: $34.50
  • Your Savings: $20.40 (37.2% Off!)


DI Boxes Explained: Protect Your Tone and Eliminate Signal Noise

A Beginners Guide

A musician holds the Hosa DIB-445 Sidekick Active DI Box in their hand, connecting an instrument cable to the input.
DI boxes: Small but mighty tools for any musician. Learn how to improve your sound with these essential devices.

Whether you’re tracking in a studio or plugging into a live PA, you’ve likely seen a small metal box sitting between an instrument and the mixing board. From guitars and basses to synthesizers and laptop playback rigs, the DI box is the unsung hero of a clean signal chain. This guide breaks down what they do and why they are essential for your rig.

What is a DI Box?

DI stands for “Direct Injection.” While they are frequently associated with guitars and basses, their core function is to solve impedance mismatches and balance the signal between any electronic instrument and professional audio equipment.

Most instruments produce a high-impedance (High-Z), unbalanced signal. This type of signal is fragile—it’s susceptible to noise, hum, and high-end signal loss (known as “tone suck”), especially over cable runs longer than 20 feet. A DI box conditions this signal, converting it to a low-impedance (Low-Z), balanced signal that is compatible with mixing consoles and audio interfaces.

The Core Function: Impedance Matching and Balancing

A DI box is a specialized circuit that serves two critical roles in maintaining your signal integrity:

  • Impedance Matching: Think of impedance like the flow of water through a pipe. A narrow pipe (High-Z) resists flow more than a wide pipe (Low-Z). If you try to force a High-Z signal directly into a Low-Z microphone input, the mismatch “loads down” your instrument’s output, rolling off high-end frequencies and making your transients sound sluggish. A DI box matches these impedances so your instrument’s full frequency range is preserved.
  • Signal Balancing: Standard instrument cables are unbalanced and act like antennas for hum and radio interference. A DI box converts this to a balanced signal (via XLR), which uses phase cancellation to strip away noise. This allows your signal to travel through long cable runs with significantly less degradation.

Passive vs. Active DI Boxes: Choosing the Right Tool

Two DI boxes from Hosa Technology, showcasing active and passive models.
Identifying your instrument’s output type is the first step in choosing the right DI circuit.

Choosing between passive and active depends on the “output” of the gear you are plugging in. A simple rule of thumb for musicians is “Opposites Attract.”

The Passive Choice: Hosa DIB-443 Sidekick

Passive DIs use a transformer to match the signal and require no power. They provide natural electrical isolation and handle “hot” signals without distorting. These are the “safe” choice for high-output gear.

The Active Choice: Hosa DIB-445 Sidekick

Active DIs include a preamp circuit and require 48V phantom power. They provide a high-headroom “buffer” that protects and preserves the life of weaker signals.

The Pro Stereo Solution: Hosa DIB-490 Pro-Conex

Hosa Pro-Conex DIB-490 Active Stereo DI Box
The DIB-490 is optimized for stereo keyboards, synthesizers, laptop playback, and DJ rigs, providing dual-channel active buffering in a single rugged chassis.

For modern stereo sources like stage pianos, synths, or laptop playback, the Hosa Pro-Conex DIB-490 is the high-fidelity choice. While passive DIs are safe for keyboards, the active circuitry in the DIB-490 keeps your transients sharp and frequency response wide, preventing the subtle “dulling” effect that passive transformers can sometimes have on complex digital patches.

The Troubleshooting Toolkit: Key Features

Once you have selected your DI, you need to know how to use the “safety features” built into the chassis to solve real-world stage problems:

  • Ground Lift: This switch breaks the physical connection between grounds to eliminate 60-cycle hum and ground loops instantly.
  • Thru / Bypass: This allows you to “tap” your signal—sending one clean feed to the mixer while simultaneously passing the unaffected signal to your stage amplifier so you can hear yourself.
  • Pad: If your keyboard or DJ mixer is “clipping” (distorting) the console, the Pad switch attenuates the signal level to keep the audio clean and manageable.

Real-World Scenarios: Which Problem Are You Solving?

Most musicians and engineers reach for a DI box when they encounter one of these common frustrations. Here is how to map the problem to the solution:

The Problem: “My acoustic guitar or bass sounds thin and brittle through the PA.”

  • The Cause: Your passive pickups are being “loaded down” by the mixer, resulting in high-end loss and a weak signal.
  • The Hosa Solution: The DIB-445 Active Sidekick. Its phantom-powered buffer provides the impedance matching needed to restore the life, warmth, and detail of your instrument.

The Problem: “The sound engineer says my stage volume is washing out the mix.”

  • The Cause: Low frequencies are omnidirectional, meaning your bass amp “bleeds” into every open mic on stage—especially vocals and drums.
  • The Hosa Solution: A Hosa Sidekick DI. By providing a direct, isolated signal, you allow the engineer to control your volume in the PA without your stage amp muddying up the rest of the band.

The Problem: “My electronic drums or keyboard are distorting the mixer, even with the gain turned down.”

  • The Cause: High-output (active) instruments send a “hot” signal that can easily overdrive a microphone preamp.
  • The Hosa Solution: The DIB-443 Passive Sidekick. Its transformer-based design naturally handles high-voltage signals without clipping, and the built-in attenuation gives you the extra headroom needed to keep your signal clean.

The Problem: “I have a loud buzz in my monitors that won’t go away.”

  • The Cause: You likely have a ground loop between the gear you are plugged into (instrument, laptop, DJ gear, etc.) and the mixing console.
  • The Hosa Solution: Any Hosa Sidekick DI. Use the Ground Lift switch to break the physical connection between grounds and silence the hum instantly without affecting your tone.

The Problem: “My laptop backing tracks are distorted and the cable setup is a mess.”

  • The Cause: Laptop outputs are often too “hot” for mic inputs, and using multiple mono DIs adds unnecessary clutter to your rig.
  • The Hosa Solution: The DIB-490 Pro-Conex Stereo DI. Use the built-in Pad to tame the hot signal and handle your entire stereo image with a single, professional chassis.

DI Spotlight: Mastering the Thru Jack and Parallel Processing

One of the biggest advantages of using a DI box in the studio or on stage is the ability to capture a “Dry” signal while still using your “Wet” (effected) sound. By using the Thru/Bypass output, you can send your pure instrument signal directly to the recording interface (Dry) while simultaneously sending the same signal through your pedals and amplifier (Wet).

Beyond simple recording safety nets, the Thru jack is a vital tool for several professional configurations:

  • The Multi-Amp Setup: Bassists often use the DI output to send a clean, deep low-end signal to the PA system while using the Thru jack to feed a distorted or “gritty” stage amplifier for mid-range punch and monitoring.
  • Stage Physics and “Bleed” Control: This is why bassists use DIs most often. Because low frequencies are omnidirectional, a loud bass amp can “bleed” into every other open microphone on stage—especially the drum and vocal mics. By using a DI, you provide the sound engineer with a clean, isolated signal that doesn’t rely on a microphone, giving them total control over the mix without the stage volume washing out the rest of the band.
  • Silent Stage Monitoring: If you are using In-Ear Monitors (IEMs), you can send your DI signal to the monitor desk while using the Thru jack to keep a tuner or a small personal mixer at your feet without interrupting the main signal path.
  • Future-Proof Tracking: In the studio, keeping a “Dry” DI track is your ultimate safety net. If you decide later that your original amp tone doesn’t fit the mix, you still have the pristine, unprocessed track ready for re-amping or software processing.

Connecting It All

Once you’ve identified the right DI for your setup, the final step is ensuring you have the “connective tissue” to maintain that signal integrity. To get up and running, you will need:

  • The Input: A high-quality instrument cable (1/4-inch jack) to connect your source to the DI input.
  • The Output: A balanced XLR cable to connect the DI output to your mixing console or audio interface.

By understanding how a DI box conditions your signal and utilizing these troubleshooting tools, you move beyond just “plugging in.” You’re actively protecting your tone and ensuring a professional, noise-free path for every performance. Whether you’re a gigging bassist, a synth enthusiast, or a playback engineer, the right DI is the difference between a “hummy” compromised sound and a studio-quality output.

Don’t be afraid to experiment with different DI models to find the perfect match for your specific gear. Your audience—and your sound engineer—will thank you.

8 Keyboard Essentials for Beginners: Must-Have Gear & Accessories to Get Started

Whether you’re embarking on a new personal hobby, setting up a system for your church band, or helping your kid learn something new: Welcome to the wonderful world of the keyboard! This blog is your shopping list for all the essential gear and accessories you need as you master the keys.

The keyboard is a great instrument and introduction to the wider world of synthesizers, but like all things digital, getting started can be overwhelming. Taking a few lessons will help you get started playing, but how do you really plug in? What other keyboard gear or accessories will you need to develop your own style – and what will you need to take your playing experience to the next level?

Here’s an overview of the essentials you will need to make your progression with this instrument that much sweeter.

8 Keyboard Products Every Beginner Needs

#1. A Keyboard, Synthesizer or Digital Piano

Of course, the only thing you REALLY need to get started playing is the instrument itself. However, there are actually three options here: a keyboard, digital piano or synthesizer.

  • Keyboard: Keyboards come with a wide range of sounds and features, and they are usually smaller than traditional pianos. The number of keys ranges from as little as 25 to as many as 88 keys. They’re great for beginners to learn on before advancing to other instruments. Keyboards are also great for worship bands who want to get a good organ sound without the expense of purchasing a traditional organ.
  • Digital Piano: A digital piano is designed to mimic a traditional piano, complete with weighted keys and more traditional sound and functionality. It typically comes with the full 88 keys like a traditional piano. While the options with a digital piano are limited, if you’re looking to learn classical piano and only play traditional styles of music, a digital piano is a more cost-effective way to play the piano without investing in a grand piano or keyboard with a lot of bells and whistles.
  • Synthesizers: Synthesizers (aka synths) are a broad category of instruments that can produce sounds by generating different signals. Synths can produce a much wider range of sounds than keyboards and are used in all types of music like pop, EDM and hip-hop. They’re used frequently in live show settings while also being mainstays in home and professional recording studios.

Deciding which instrument to buy is up to you, your budget and how you plan to use it. There are a lot of great guides out there that can help you narrow down which keyboard (or other keyed instrument) is right for you.

Once you’ve decided on your instrument, here are some of the accessories you’ll want to get to make it your own.

#2. A Keyboard Stand

For a proper keyboard experience, you will want to set your keyboard (or digital piano or synth – hereby referenced as a keyboard) on a proper stand instead of, say, your kitchen table.

A specialized keyboard stand is great for getting your keyboard at the exact height you need to play comfortably. It also lets you get creative with your set up, providing full access to the instrument to connect extra amps, sound mixers and pedals.

When you’re starting out, you don’t need something that will cost hundreds of dollars, but you don’t want to skimp on features and quality. So, look for a stand that’s durable, lightweight and easy to set up. X-frame stands with quick-trigger height adjustments make set-up easy and consistent, and they tend to be cheaper than their Z-frame counterparts.

#3. A Bench or Stool

You don’t want to play standing up all the time, right?

Yes, you can play from just any old chair, but a stool or piano bench is a much better and ergonomic option. A proper bench allows you to sit up straight without any armrests or seat backs to get in the way of playing up and down the keys.

Getting a proper piano bench or stool can help you play with better posture, so you can practice longer and play with more precision.

#4. Covers and Cases

If you’re going to be playing shows or practicing with friends, you’ll want a case to transport your keyboard.

The sturdier, the better. Make sure you find one that’s not too small for your keyboard and comes with extra padding to prevent scratches and dents.

If you’re going to be traveling long distances, heavy-duty padding is essential because luggage tends to get shaken up in flight.

Another thing to consider is a keyboard cover to keep the dust off your instrument while you’re not playing. Dust and dirt can collect on keys and, over time, ruin their press and feel. If you’re already dealing with dusty keys, use a gentle instrument cleaner.

#5. Headphones

A good pair of headphones is essential if you live in a shared space or want to keep it down as you’re playing. Plus, some keyboards have no audio output, which means you need to be plugged into an interface or headphones to hear anything (see keyboard accessory essential #6).

Of course, your standard pair of earbuds would work. However, if you want to hear the full range of your music, you’ll want something with better sound quality – something that was made for this type of music. Here is a good pair of affordable, studio-quality headphones.

Comfort is another consideration. Find a pair that fits well over your ears without pinching or squeezing too tight, so you can play for as long as you like.

#6. A Portable Amp

Many keyboards come with built-in speakers. But if you’re going to be playing gigs or at your local church, you’ll need to amplify your sound.

You can get as fancy as you want here but don’t buy something that will be too big or too loud for the space you will be playing in. A good all-around portable amp will do the trick, especially early on in your playing career.

#7. Sustain Pedal

Sustain pedals allow you to extend the notes and cords you’re playing, helping you add even more flair and expression to your playing.

Many keyboards come with a sustain pedal or effect built-in, but if yours doesn’t or if you want to enhance the built-in effects, a new sustain pedal can help you unlock more sounds to make your play more interesting. Here is a good one for beginners available at Sweetwater.

#8. Cables to Connect it All

Last but definitely not least, make sure you have cables to connect everything.

While we know cables aren’t the most exciting piece of gear you’ll buy, you would be surprised to learn how many different cables and connectors there are. Finding the exact cable you need can be a bit of a challenge if you’re not sure what to look for.

For a beginner keyboardist, you’ll want a classic instrument cable to connect your keyboard to any amp. You’ll also want to grab some patch cables to connect any pedal effects to your setup.

As you progress, you might think about getting a synthesizer and setting up your own DAW or digital audio workstation. If you do, just remember that the cables you use to connect your keyboard setup won’t work on a digital set up. You’ll need MIDI cables to properly record and mix tracks.

If you’re confused about what you need, we have a cable finder tool that can help!

Start Your Keyboard Journey on the Right Foot

Picking up the keyboard for the first time can be intimidating. But it’s also an exciting start that can lead to many different instruments and ways to create music.

As you start out learning your first scales and songs, remember to keep in mind this list of gear that can help you along the way.

Hosa

Hosa Introduces New Keyboard Stand

Portable, lightweight design with unique trigger-style adjustment for quick set-up & tear-down

Buena Park, CA, August 2023 — Hosa is pleased to announce the release of their new KBT-502 Keyboard Stand.

The KBT-502 Keyboard Stand offers incredible portability in a lightweight, 6.5-pound X-frame design that also features a unique trigger-style adjustment lever with seven height settings. This makes for convenient and easy setup with no assembly required. Despite its size, the KBT-502 packs a punch and can support up to 88 pounds of total weight, making it an ideal choice for a range of keyboards and players. The KBT-502 has a street price of $44.95.

KBT-502 Features
-Portable X-Frame
-Lightweight (6.5 lbs.)
-Single-Handed Trigger Height Adjustment
-Seven Height Adjustment Settings: 21″/53 cm – 37.4″/95 cm
-Weight Capacity: 88 lbs./40kg

“We believe the KBT-502 Keyboard Stand is perfect for beginners and enthusiasts alike,” said CEO Mayumi Allison. “We didn’t pull any punches in its design, making sure it’s as light as possible without sacrificing reliability or performance. We’re always looking for new ways to support musicians of all skill levels. The KBT-502 stand adds to our industry-wide reputation of making high-quality cables and accessory products accessible to all.”

For more information and to purchase the new keyboard stand, click here.

Hosa

Hosa Exhibiting at NAMM 2023!

Stop by #15108 Hall ACC North Level 1, April 13-15

Buena Park, CA, April 2023 — Hosa is excited to announce it will be exhibiting at the 2023 NAMM Show, April 13-15.

Attendees are encouraged to stop by #15108 Hall ACC North Level 1 to learn more about Hosa’s extensive line of products and distributed brands including Gruv Gear bags, and accessories, and CAIG Laboratories line of contact cleaners.

During the show, Hosa representatives will be on hand to answer questions about their products and application solutions.

Hosa will also be hosting a Project Studio Giveaway, with products from Adam Audio, Focusrite, IK Multimedia, JHS Pedal, Orange Amplifiers, Schecter Guitars and more. NAMM attendees can enter the giveaway by completing a brief cable-themed quiz at one of their six kiosks in the booth. Winners will be notified at the end of the NAMM show, and every participant will receive a limited Hosa t-shirt just for taking the quiz.

“Reconnecting with our dealers and distributors as well as our dedicated enthusiasts and professional musicians at The NAMM Show is always the highlight of our year,” said CEO Mayumi Allison.

For more information about the 2023 NAMM Show and how to register, click here.

Hosa

Setting Up a Church Sound System: 4 Tips Before Jumping In

Setting up a church or house of worship sound system can be a daunting task, and not just for first-timers. In this post, we review a few things to keep in mind as you plan.

Church sound systems aren’t very different from any other indoor sound system.

You still have the same basic components – a mixer, PA speakers, mics, in-ears or wedges, iso-booths for instrument speaker cabinets, lighting, digital mixers, and the instruments.

However, there are some distinctions about a church environment that you must keep in mind. As with any sound system setup – whether it’s a simple recording studio or a large indoor venue –  it’s easy to overlook the effect of the smaller components and their impact on the overall sound.

But before we get into the setup of your sound system, let’s cover what it should all sound like.

What is a “Good” Church Sound?

Good sound in a church or worship setting is all about control. The sound and experience should be focused primarily on the vocals, so the instruments need to be limited so as to not overpower the vocals.

The instruments will ideally be clean and punchy, but they shouldn’t be loud. The vocals should come through clearly without any harsh reverb or feedback. You want your congregation to be able to hear the lyrics and respond in the right moments, which requires controllable separation between the instruments and vocals.

#1. Know the Challenges

The problem sound engineers run into is that churches are often massive, open spaces with significant echo. Getting a tight and controlled sound with the vocals at the forefront is difficult – especially when the church band includes a lot of instruments.

As a sound mixer or engineer, unfortunately, there are a lot of factors out of your control. You have to trust that the band can play at the right level and that the church has done all they can to set up their building to be as acoustically friendly as possible.

With that out of the way, let’s dig into the things you can control.

#2. Control the Acoustics

Good sound is about control. And, as we mentioned, in a worship setting that mostly means controlling the noise levels of the instruments to prevent them from overpowering the vocals delivering the message.

To do this, you should use iso-booths for the speakers, plexiglass surrounds to dampen the drums, digital solutions that can connect to the right mixers, and opt for in-ear monitors instead of wedges. In-ear monitors allow you to mix the instruments for the performers to hear themselves without affecting the overall volume of the room.

#3. Pick the Right Cables

You can use the best equipment. You can mix everything perfectly. But if your system isn’t connected properly, sound, lighting, and effects will suffer.

Many people overlook the importance of good cabling in a sound system. Using poor-quality cables can negatively impact your sound quality by introducing noise and unwanted feedback into the mix.

Here’s a list of every cable you might possibly need…

#4. Organize Your Gear

Church sound systems are beasts and require planning and organization.

With so many cables running to mics and sending sound everywhere, cable organizers and gaff tape will be a critical part of your arsenal. They keep the cable runs discrete and help prevent people from stepping on them or tripping.

Preventative measures will also save you a lot of headaches, so consider using a cable tester to test connections and make sure everything is working properly before the service. Use instrument stands to keep unused instruments out of the way and undamaged. And finally, cleaners like mic sanitizers, surface and headphone cleaners will help maintain the condition and cleanliness of your equipment over time.

Conclusion

Setting up a church sound system is a process. But a little preparation goes a long way. If you account for the unique environmental qualities, you’ll be well on your way to getting a great sound for every service. Thanks to good-quality cables and plenty of intuitive digital sound equipment, homing in on the right sound for your church worship is easier than ever.

Hosa

Hosa Introduces New In-Line Mic Preamp

In-Line Preamp Adds +26dB of Clean Gain and Improves Sound

Buena Park, CA, October 2022 — Hosa is excited to announce the newest addition to its in-line microphone adapter collection, the MPA-149 Mic Preamp.

When using low-output dynamic or passive ribbon microphones, a consistent struggle is the introduction of noise from external preamps. Consoles, mixing boards, interfaces, and other preamps can sometimes require the gain to be maxed out, amplifying unwanted noise and often still being too quiet in overall volume. The Hosa MPA-149 Mic Preamp provides an immediate 26dB’s of gain with an impressive -97dBu signal-to-noise ratio, giving users a very clean and immediate gain boost for louder, clearer microphone performance.

Many volume-boost solutions include more cables, electronics, and failure points, whereas the Hosa MPA-149 simply connects directly into the microphone. This convenient solution makes it ideal for podcasters, streamers, public speakers, and gigging professionals relying on unpredictable venue preamps to power low-output ribbon or dynamic mics. The Hosa MPA-149 only needs a preamp supplying 48V phantom power, but does not pass the phantom power onto the microphone.

The Hosa MPA-149 utilizes a discrete Class-A circuit design and selected FET circuitry to help achieve a clean signal path and low-noise operation. Its compact metal housing is designed to perform reliably in any circumstance, whether it’s standing up to harsh environmental changes, eccentric performances, or getting thrown in and out of gig bags on the road.

“With so many microphones to choose from on the market today, many customers are purchasing dynamic and ribbon microphones that, depending on their application, may require more output”, adds David Chavez, Hosa’s Director of Product Development and Marketing. “Our new MPA-149 Mic Preamp resolves this very issue, and does so in a high-quality, affordable form-factor that the Hosa brand is known for.”

Hosa

Hosa Introduces New USB-C Adapter

Adapts a USB Type A to Type C connection

Buena Park, CA, September 2022 — Hosa is again answering the call for more USB-C solutions with a USB Type A to Type C adapter.

USB Type C connectors are needed more and more in newer devices requiring greater power and transfer speeds. This inevitably creates compatibility issues for those users with a mixture of new and old devices and USB cables. Newer devices, such as Apple laptops, no longer incorporate USB Type A ports and instead only feature Type C, leaving users with equipment dependent on USB cables that are no longer supported.

The new Hosa GSB-314 USB Adapter resolves the issue by adapting a Type A connection to Type C, allowing you to use all previous USB connection types with the current Type C. It’s backwards-compatible up to USB 3.0 with burst speeds up to 5 Gbps, ensuring devices get the power and transfer speeds they require.

“In our 38 year history, Hosa has always been seen as the go-to for a wide array of small adapters”, adds Mayumi Allison, Hosa’s Chief Executive Officer. “As the landscape continues to change with USB-C, people with legacy equipment will look to Hosa first for these types of solutions, and we’re always looking for those gaps to fill.”

Hosa