Every guitarist’s collection likely includes guitar pedals or a full pedalboard setup. Whether you’re just beginning to build your pedal collection or looking to optimize your existing setup, it’s important to know what configuration works best for you. From cables to couplers, pedal order to power sources, there are some key basics to follow when beginning your guitar pedal setup project. After that, creativity can be your primary guide.
Find what you need to make your music happen with guitar cables in all lengths and styles from Hosa.
What Are Guitar Pedals For?
If you’re just getting started, it’s possible that you’re discovering the tonal limits of your guitar amp. Perhaps you’re looking to expand your audio palette with more versatile and varied audio effects, such as echos, distortion, delays, and repeated loops. The possibilities are seemingly endless, and once you begin to layer these different options into your routine, you may find yourself discovering new signature sounds and effects.
Experimentation is key to discovering new sound combinations and techniques, and building your own guitar pedal collection is the first step in finding new sonic possibilities.
What are Guitar Patch Cables?
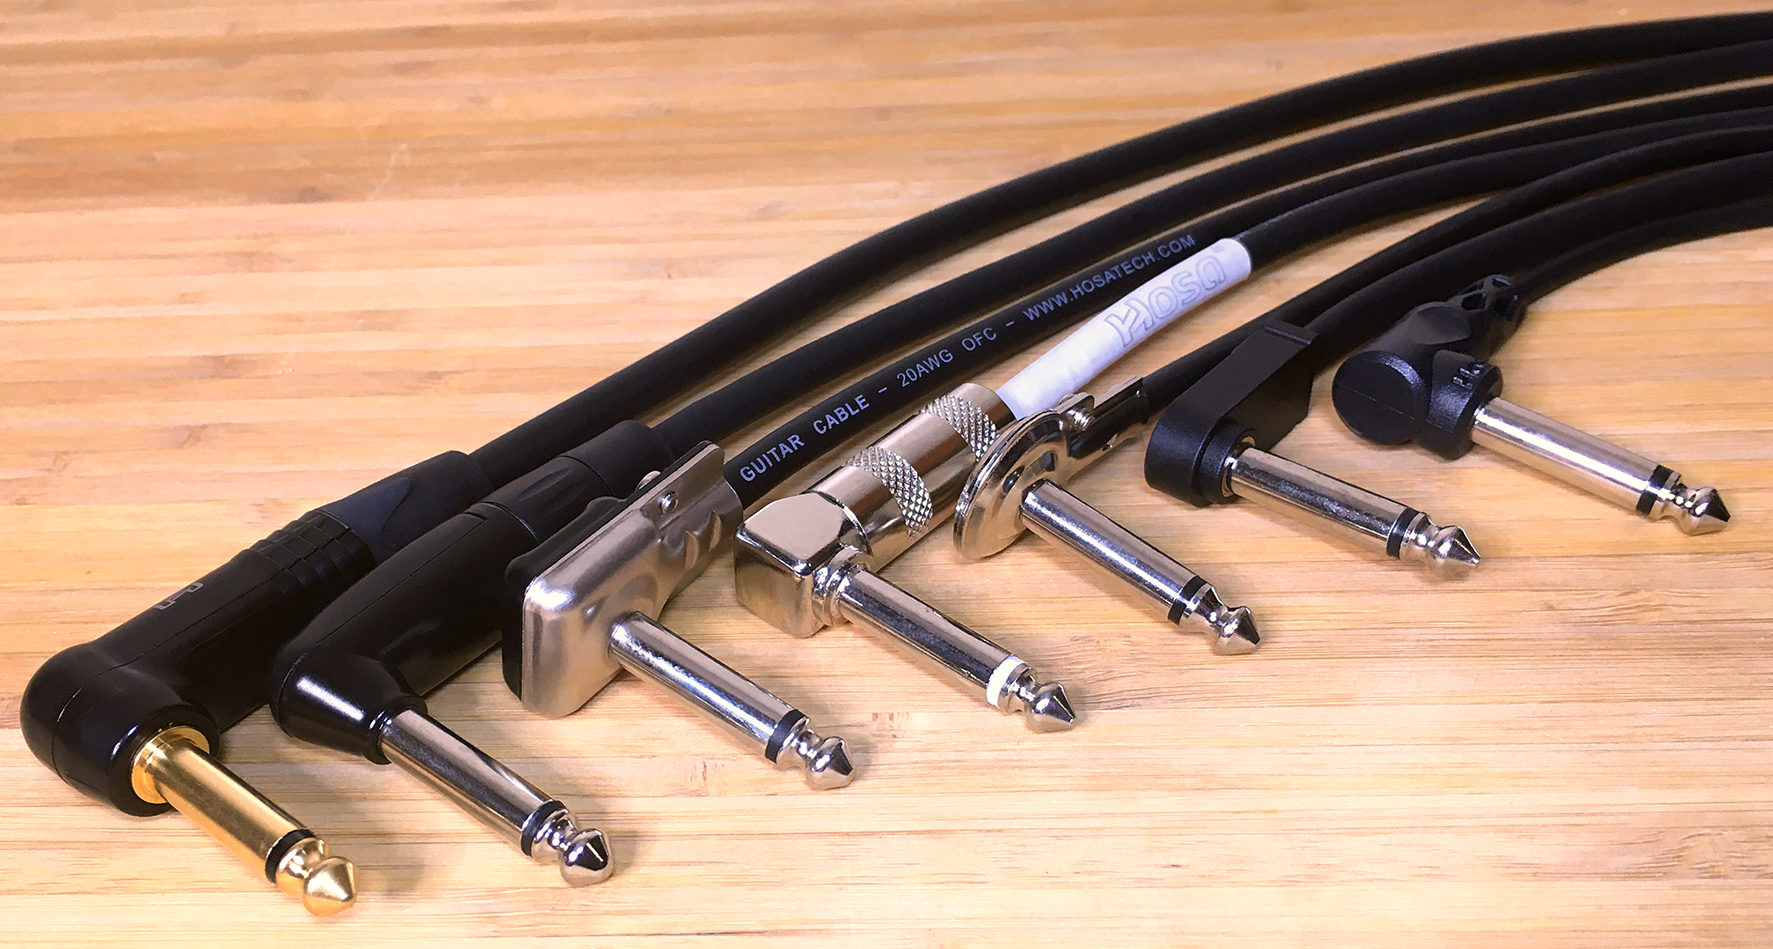
Guitar patch cables help connect your pedals together, and also connect your pedalboard to your amp. Short right-angle guitar patch cables help connect pedals side-by-side into a single chain to reduce cable clutter, maximize pedalboard space, and preserve sound quality. You will also want slightly longer patch cables to connect to other pedal chains or to the input and output of your amp. Pedals may have input and output jacks on either top or side locations, which may dictate what length your pedalboard patch cables need to be.
What Are Couplers?
Similar to guitar patch cables, guitar couplers connect pedals in your guitar pedalboard setup. It is very important that you only use couplers for pedals that remain on and therefore do not require you to step on them to engage them. This is because the rigid connection of the coupler can easily wear down your jacks and ruin gear if placed under the frequent torque stress of foot-activated switches.
For pedals that remain on or are connected to a loop switcher, straight guitar couplers for equal jack placement or Z-type guitar couplers for uneven jack placement can help you save space and reduce cable clutter.
How to Set Up Guitar Pedals
One of the most important parts of wiring a guitar pedal chain is planning order and layout. Once you have a small collection of pedals, you may want to consider investing in a pedalboard to hold and organize them all in one compact space.
A pedalboard is a single organizational backboard piece that allows you to place and reorganize your pedals while also reducing cable clutter. They are also useful for securing a pedalboard power supply unit to maximize the power supply potential for your pedal collection.
When planning your guitar pedal setup, you want to use as little cable length as possible to connect the pedals. This is because longer cables can reduce sound quality. Many pedals are “true bypass,” meaning when they are off, the signal transfers through them without any added coloration. While that’s great for transparency, any pedal that does not act as a “buffer” to add strength to the signal means it’s essentially adding cable length, which can start to degrade the sound in unbalanced instrument cables. For those reasons, short 6-inch right angle guitar patch cables are preferred among guitarists.
Powering Your Guitar Pedals: Voltage, Current, and Polarity
It is crucial to match the voltage of your pedals to the voltage of your power supply. The standard 9V pedal should connect to a 9V power supply. While most guitar pedals are a standard 9V, you may find that vintage or specialty guitar pedals range from 12V, 18V and 24V. This means that different voltage pedals may need their own individual power supply, unless you have a multi-voltage power board unit with various voltage outputs.
It’s important to pay attention to the voltage of your power supply and pedals and match them appropriately so you don’t risk ruining your pedals.
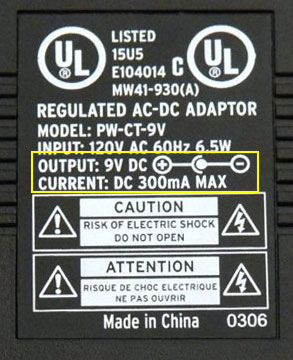
You must also have a power supply with enough current to power the pedal(s) it’s connected to. For example, a pedal requiring 100mA (milliamp) of current must have a power source that can accommodate this current level, or more. It’s perfectly safe to use a 1000mA (1A) to power a 100mA pedal, as the pedal will only draw as much as it needs. This will also allow you to connect more pedals to this power source. Having a higher mA output on your power source may allow you to daisy chain several pedals to one source (see below).
Lastly, make sure your power source polarity (negative or positive) matches the polarity of the pedal you plan to attach. Typically, both will have a center pin with negative polarity, though it’s always a good idea to make sure they match to avoid damaging your equipment. Both items should have a matching polarity emblem:

Single Power Source and The Daisy Chain Method
The daisy chain power supply method involves connecting an assortment of pedals together with guitar patch cables to use one singular power source. It is crucial that all pedals share the same voltage. Similarly, you must ensure that the mA output of the power supply can handle the aggregate mA current load of all the pedals connected. You can also use a daisy chain extension cord to connect your pedals directly to the power source if you only have a few pedals, rather than running power through shorter guitar patch cables between each pedal. Be wary that sharing a power supply can sometimes introduce additional noise depending on the amount of pedals or voltage involved.
Power Source Unit
Once you begin to accommodate more pedals, you may find that you need added versatility and power options. Power source units are a great way to ensure that you’ll be able to easily power your growing collection of guitar pedals and reduce cable clutter when building your pedalboard. Some can accommodate different voltages, which also means you won’t have to worry about finding separate power sources for pedals that differ from the standard 9V format.
Battery Powered Pedals
If you’re looking for portability and minimal cable use, you can also power many pedals with 9V batteries. Some guitar pedals are designed to accommodate either a plug-in adapter power source or battery power. The battery-powered option is typically good for up to three pedals, as larger pedal collections may require costly battery replacement with use over time. You also might not want to risk having your battery-powered pedal die in the middle of a performance. If you like having the battery option for practice, however, you may want to invest in rechargeable 9V batteries to help reduce long-term battery costs.
Order of Guitar Pedals: Building Your Effect Signal Chain
Once you’ve figured out your pedal specs and compatibilities, you’ll also want to consider the order in which you attach your pedals. Pedal order may alter tone or effects, so make sure you’re thinking about sound filtering and placement. While there are some recommended setup orders, you may find it best to experiment with pedal order to see how each change affects your overall sound.
Several types of pedals are typically connected early in your pedal chain in your preamp section, which are then connected to the “input” jack of your amp. These include:
- Tuner – adjusts tune of guitar input to improve overall sound
- Volume – adjusts volume of your input sound (including any preceding pedal effects)
- Distortion/Overdrive – increases the gain of your audio signal and saturates the notes being played
- Wah & Filter – serves as a low-pitch filter and changes the tone of your signal
- Compressor (Dynamics) – levels the audio dynamics of your instrument for a cleaner sound
- Booster – increases signal level of your guitar and allows for louder overall volume range potential
Other pedals can be connected in an amp loop created by the “Send” and “Return” jacks on your amp, which processes the signal after the preamp. These pedals might include:
- Delay – records sounds and replays them at programmable time intervals
- Reverb – creates an echo and “spacial” effect to produce a fuller sound
- Chorus (some Chorus pedals also work well preamp) – replicates and delays instruments by milliseconds to create the sound of multiple instruments being played
Ultimately, you’ll want to experiment with how the order of your guitar pedals affects tone and sound quality. Each pedal modifies the sound it receives from previous pedals, so keep this in mind when determining your pedal order and connecting your guitar patch cables.
Once you’ve figured it out, you may want to diagram or design a quick and easy way to remember the guitar pedalboard setup you most prefer. This could include clear labelling or a fixed setup on your pedalboard.
Shop Hosa guitar patch cables to create your custom pedalboard and discover your new favorite sound.
Hosa
